

With its unique “invisible” texture and excellent compatibility, inkjet vinyl labels are becoming a must-have for more and more craft enthusiasts, designers and even small businesses.
Whether you plan to print vivid “floating” patterns on glass, metal or plastic, or create delicate clear labels for your products, inkjet vinyl labels can help you and your creativity transcend the confines of traditional paper labels.

Wondering how to choose the right materials, adjust your printer settings, and apply those labels perfectly?
Read on, from a basic introduction and comprehensive guide to common pitfalls when printing, this article will give you a clear overview.
What Are Vinyl Labels?
Vinyl labels are clear self-adhesive stickers made from polyvinyl chloride (PVC) or polyethylene terephthalate (PET), both of which have a special surface coating that absorbs ink quickly.
Designed for specific printing technologies, these labels are available in inkjet-compatible and laser-compatible versions, with this article focusing on inkjet-compatible.
The main features of these labels include:
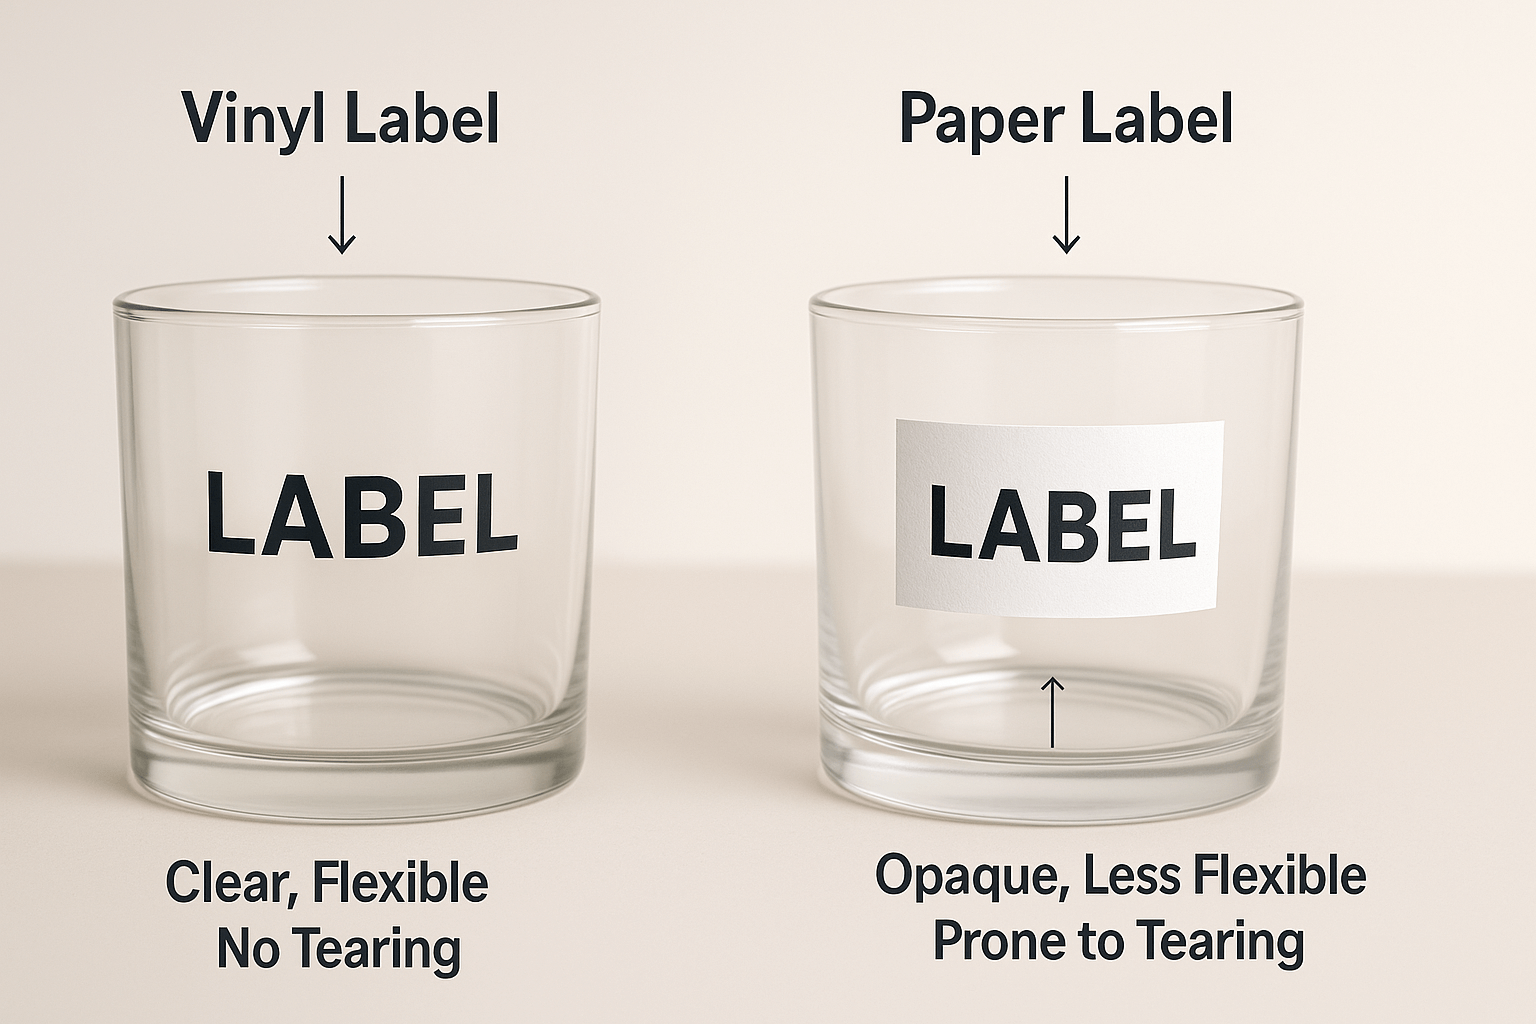
High Transparency: With a light transmission rate of over 90%, the design appears to seamlessly integrate or float on the application surface.
Material Flexibility: PVC labels are soft and flexible, making them ideal for curved or irregular surfaces such as glassware or bottles, while PET labels have a higher degree of rigidity and durability, making them better suited for flat or high-performance applications.
Adhesive Options: Permanent adhesives for long-lasting applications or removable adhesives for temporary use and clean removal are available. Please note that removable adhesives may have slightly reduced water resistance.
Key Benefits of Inkjet Vinyl Labels
Invisible Canvas for Boundless Creativity
Thanks to the clear base, you can layer designs over any background texture or color. For example, using high‑transparency inkjet vinyl labels for glass surfaces creates a stunning floating effect on transparent drinkware or windows.
Printer‑Friendly and Fast Drying
The specialized coating absorbs ink quickly, supporting 6‑color and beyond printers for smooth gradients.
Typically, labels dry in 10–30 minutes—just select “Glossy Photo Paper” or “Vinyl Sticker” mode, and you’re set with your home printer.
From Microscopic Detail to Large‑Format Flexibility
- Standard Sizes: 8.5×11″ (A4) sheets work with most home printers;
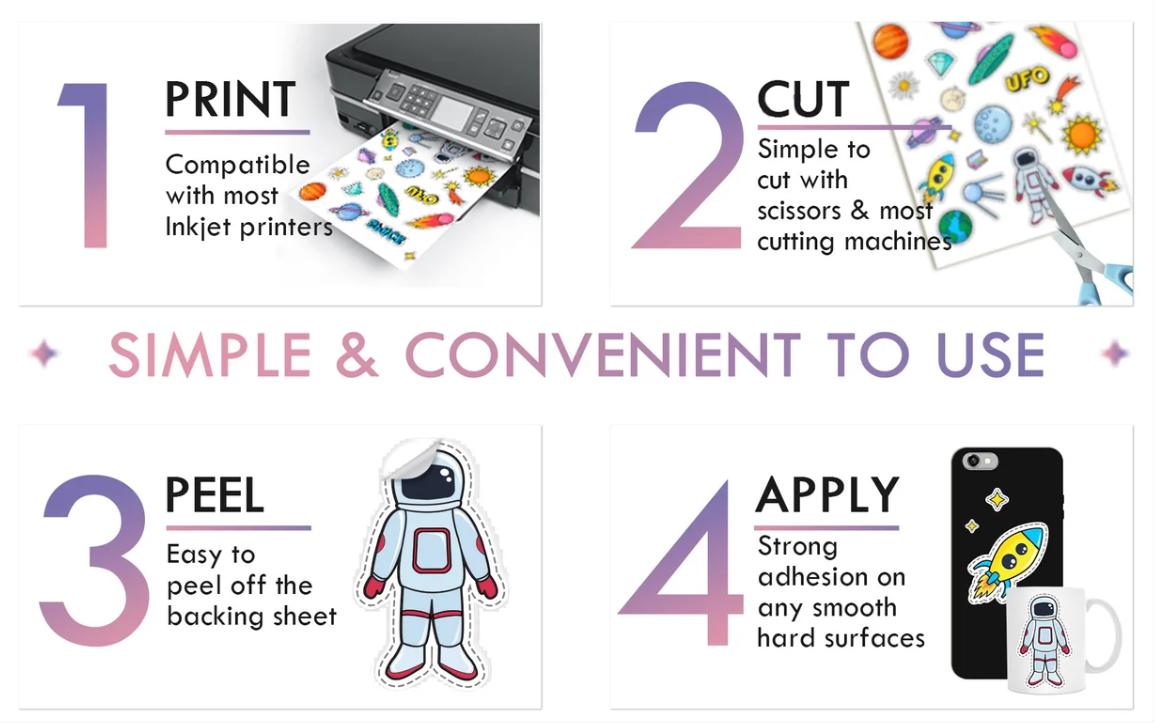
- Custom Cutting: Use a craft knife, cutting machine (e.g., Cricut), or scissors for precision shapes down to hair‑thin lines;
- Layering: Stack multiple transparent sheets to build depth and intricate shadows for cards, labels, or art pieces.
Creative Applications
From everyday crafts to professional branding, nothing compares to the versatility of these clear stickers.
For more custom options and bulk orders, explore A‑SUB, a trusted name in high‑quality printing substrates.
- Handmade & Decor: Floating text in bullet journals, ethereal acetate overlays in scrapbooks, or gold‑ink logos on gift packaging.
- Branding & Packaging: Transparent product labels on cosmetic jars or clear closure seals that showcase your product and logo simultaneously.
- Education & Organization: See‑through formula decals on lab equipment, minimalist file labels on acrylic organizers, or removable classroom charts on glass boards.
Printing & Application Tips: A Comprehensive Guide
Before Printing: Design & Settings
- Reserve Transparent Areas: Leave unprinted zones for maximum “floating” effect.
- Contrast Matters: Use light ink on dark substrates and vice versa; Keep text ≥8 pt for sharpness.
- Printer Configuration: Opt for pigment inks (for better water resistance), set 300 dpi or higher, and choose a “Vibrant” color profile.
After Printing: Cutting & Applying
- Cutting Tools:
- Hand‑cut straight lines with a craft knife and metal ruler.
- Use cutting machines with registration marks for chip‑free precision.
- Application Technique:
- Wipe surfaces with isopropyl alcohol to remove dust and oils.
- Position large decals using transfer tape or painter’s tape.
- Press edges firmly with a squeegee or even a credit card to avoid bubbles.
When in Doubt, Contact Us
Whether you’re troubleshooting first‑time prints or need tailored advice, our team is here to help every step of the way.
Maintenance, Storage, and Common Pitfalls
- Water Resistance Myths: Non‑waterproof labels can handle brief splashes but won’t survive full immersion. For true waterproofing, choose dedicated waterproof variants or spray a compatible sealant.
- Adhesive Mismatches: Removable labels are ideal for temporary decor; permanent sticks are best for long‑term or outdoor use—always test on a scrap first.
- Ink Compatibility Issues: Cheap off‑brand sheets may smear or feather. For savings and consistent quality, check out our full range of vinyl labeling materials at A-SUB.
Conclusion
Inkjet vinyl labels offer both transparency and professional-grade printing, making them especially popular with crafters, designers, and brands.
Of course, by mastering design balance, printer settings and application techniques, anyone can turn ordinary surfaces into eye-catching displays.
Get all your materials ready and let your creativity run wild.
Contact us today for free samples. A-SUB is proud to partner with our global suppliers and customers to power their business needs.
Leave a Reply